How to create an interactive Solidity lab with Hardhat?
We'll divide this part into 5 sections:
- Creating lab metadata
- Setting up lab defaults
- Setting up lab challenges
- Setting up evaluation script
- Setting up test file
Introduction
This guide would assume that you already have created an interactive course from your instructor panel. If not, go here and set it up first
Step 1 - Creating lab metadata
- Add a new item lab in your course curriculum page
![]()
A new lab item gets added. Click on the edit pencil button on the right. This should open the lab library widget in your instructor panel.
You should now be able to write a quick lab name and press on "Create Lab" button. This would create a lab you would be able to edit.
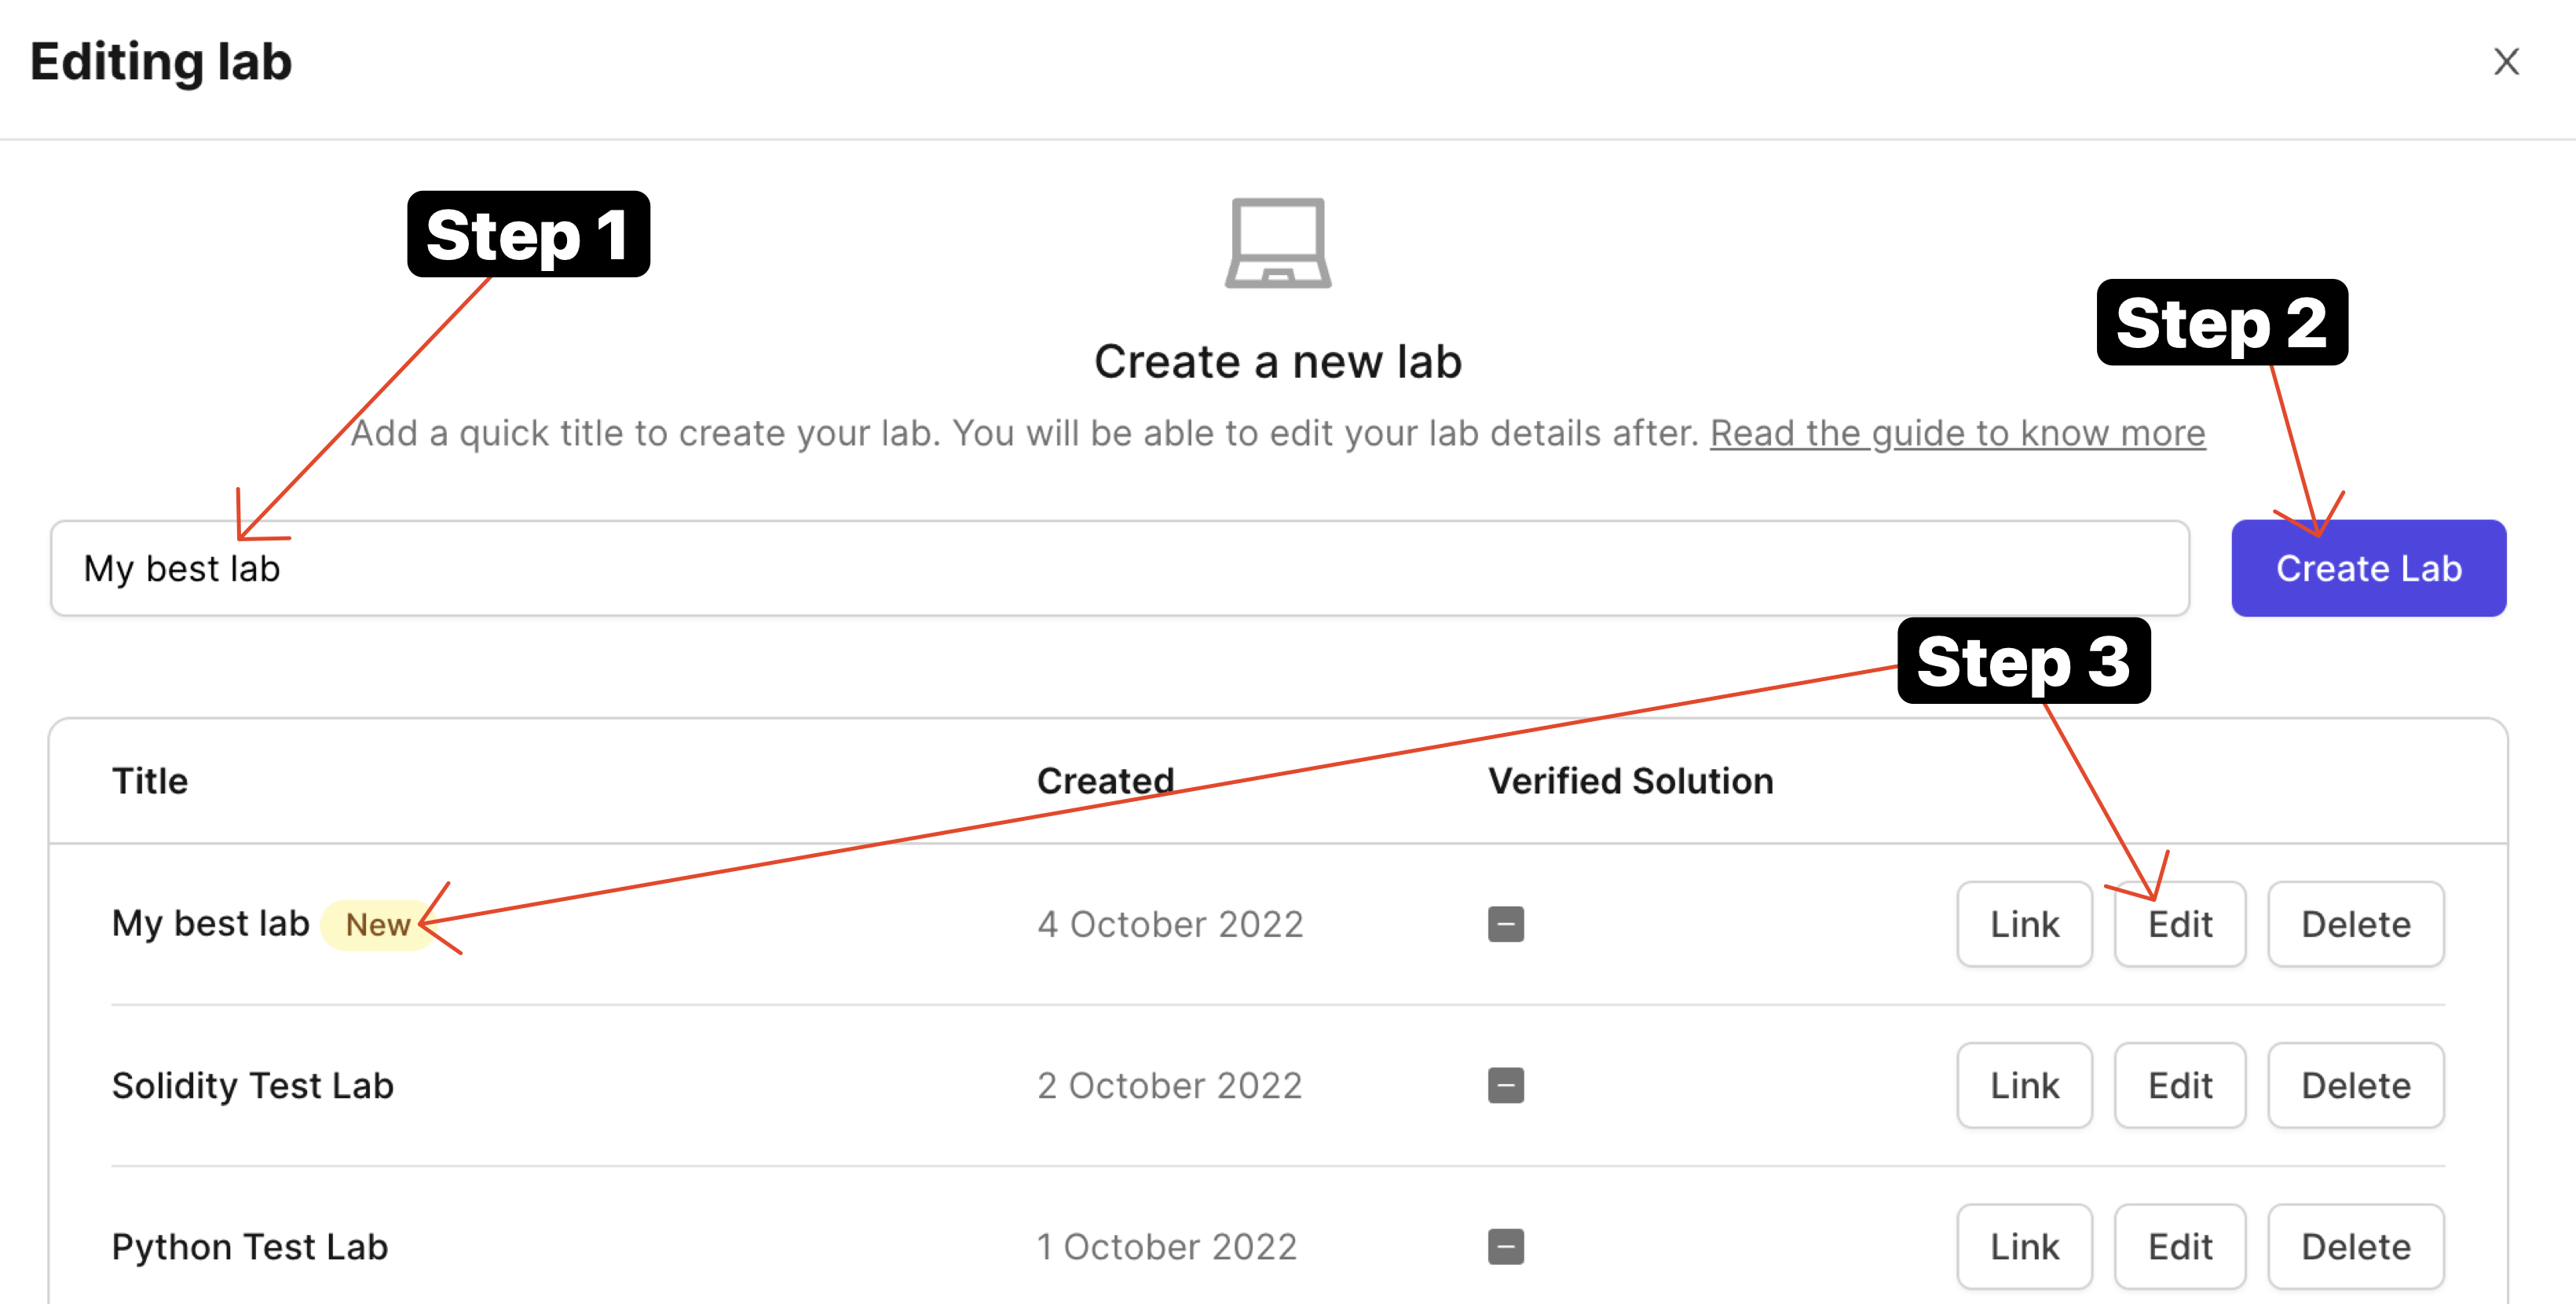
- Once it is created, click on the "Edit" button and you'll arrive at lab designer view.

This is where you will add metadata to your labs and setup your labs for evaluation. Let's take a look at all the tabs here.
Lab Details
Lab details is the tab where you add two important things:
- Lab title
- Lab description
This can be used as a helper text area for your lab. You should include as much detail as possible here to make it easier for the user to understand and solve your coding lab.
Let's move to the next tab now.
Container Image
Container image should be set as Web 3.0 for Solidity labs.
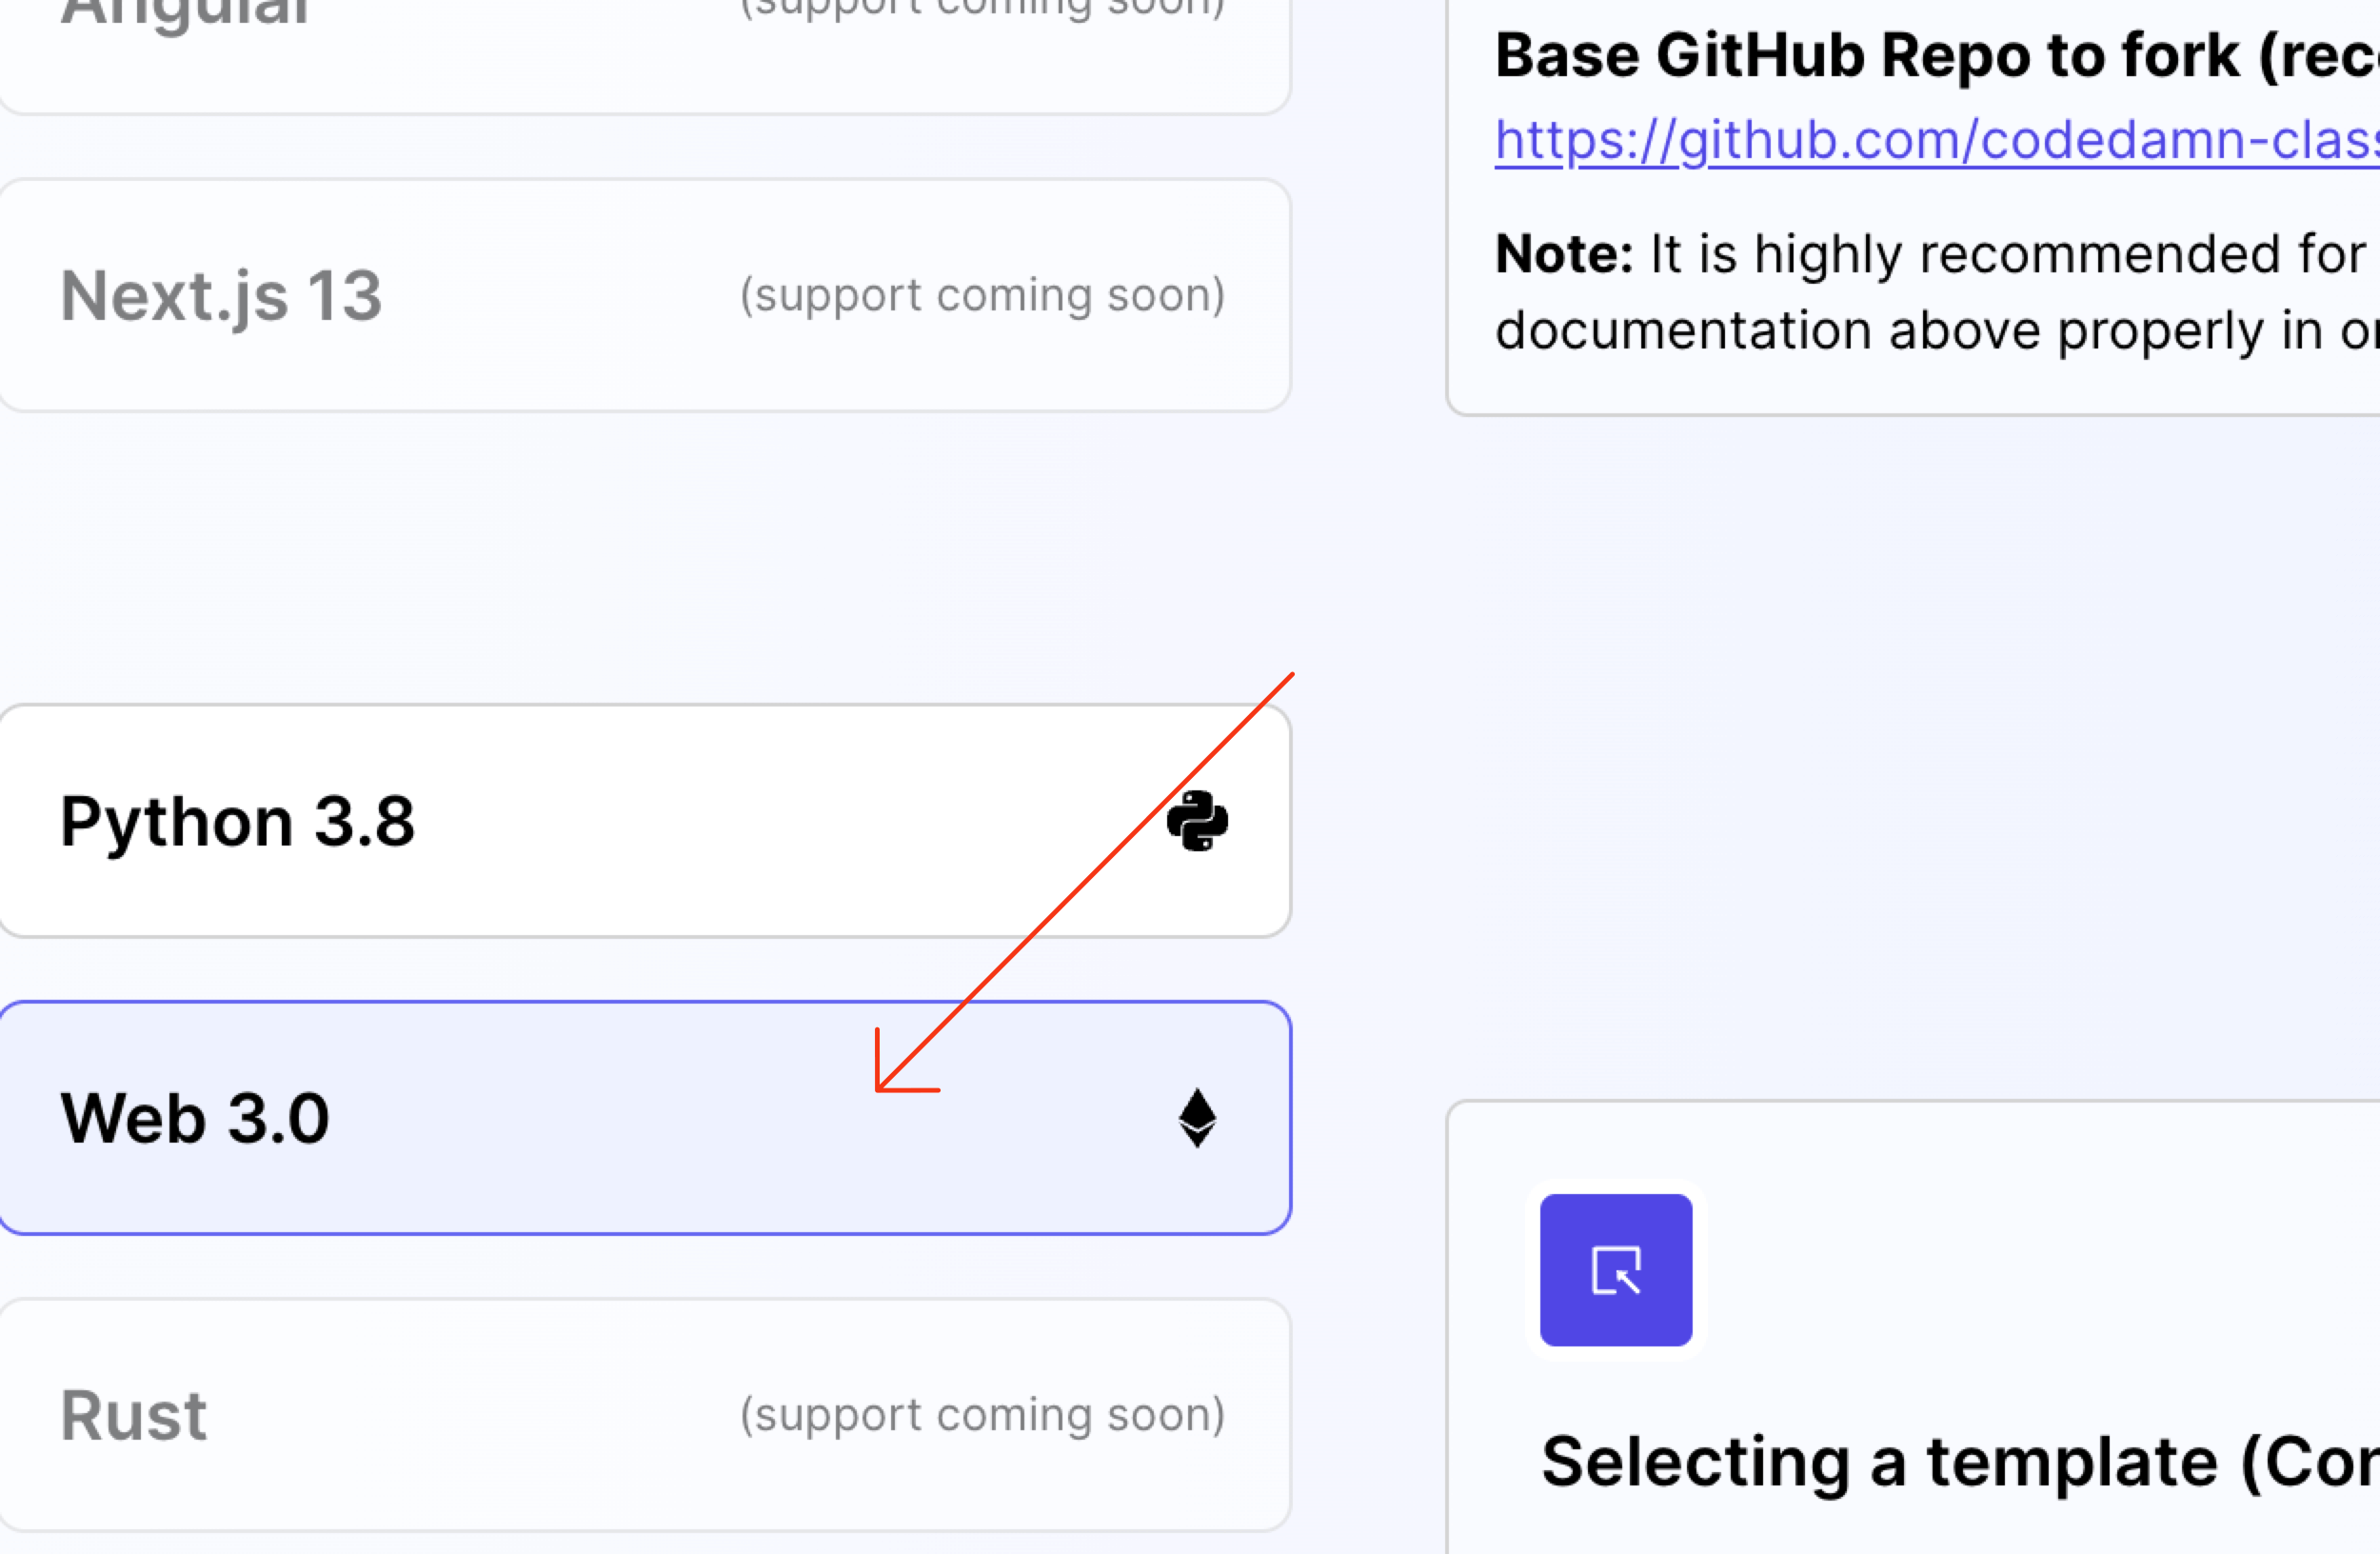
We'll be cloning and using a playground that sets up a Hardhat project from scratch.
Lab Layout
Lab layout can be used to set a default layout in which the lab boots. We currently support the following layout types:
Terminal + IDE + Browser
This would include everything codedamn has to offer - a terminal at the bottom, an IDE in center (powered by Monaco on desktops, and CodeMirror on mobile phones), and a browser preview of (ideally) what user is working on. This is best if your playground runs a HTTP server.
Terminal + Browser
This layout is for times when you don't need IDE in place, and only want something hosted inside a browser - like a XSS challenge.
Terminal + IDE
This layout is for backend programming without website UI. This would only include a terminal and an IDE - like VS Code. For example - headless E2E testing, writing Python scripts, discord bots, etc.
Terminal only
This would not include anything, except for a terminal. Best for Linux/bash labs where you want users to exclusively work with terminals only.
TIP
You can configure the layout through .cdmrc file too. More information here
Step 2 - Lab Defaults
Lab defaults section include how your lab environment boots. It is one of the most important parts because a wrong default environment might confuse your students. Therefore it is important to set it up properly.
When a codedamn playground boots, it can setup a filesystem for user by default. You can specify what the starting files could be, by specifying a git repository and a branch name.
TIP
For Solidity, we recommend you to fork the following repository and use it as a starter template: Solidity + Hardhat template - codedamn
INFO
You will find a .cdmrc file in the repository given to you above. It is highly recommend, at this point, that you go through the .cdmrc guide and how to use .cdmrc in playgrounds to understand what .cdmrc file exactly is. Once you understand how to work with .cdmrc come back to this area.
Let us briefly understand what this repository does.
- It uses hardhat as the toolkit which can be customized from the
hardhat.config.jsfile. - Inside of
previewfolder, there is a simpleserver.jsfile written. This file, alongsideui.jsxanddoc.htmlprovides a very simple UI for the user to manage the contracts. - These contracts are written inside
contractsfolder. They are automatically complied by theserver.jswhenever it changes. - The
.cdmrcfile starts thispreview.jsserver and allows user to write smart contracts in-browser while compiling them automatically.
INFO
You can choose to remove the preview folder completely, and customize .cdmrc file according to your needs. You can read more about .cdmrc and how to use it here.
Step 3 - Lab challenges
Next step is to setup challenges and evaluation for your lab. This is the part where your learners can learn the most because they will have to pass certain challenges.
TIP
It is highly recommended for you to watch the video below to understand the architecture
This is the biggest advantage of using codedamn for hosting your course too - to make them truly interactive and hands-on for your users.
Let's start by setting up challenges.
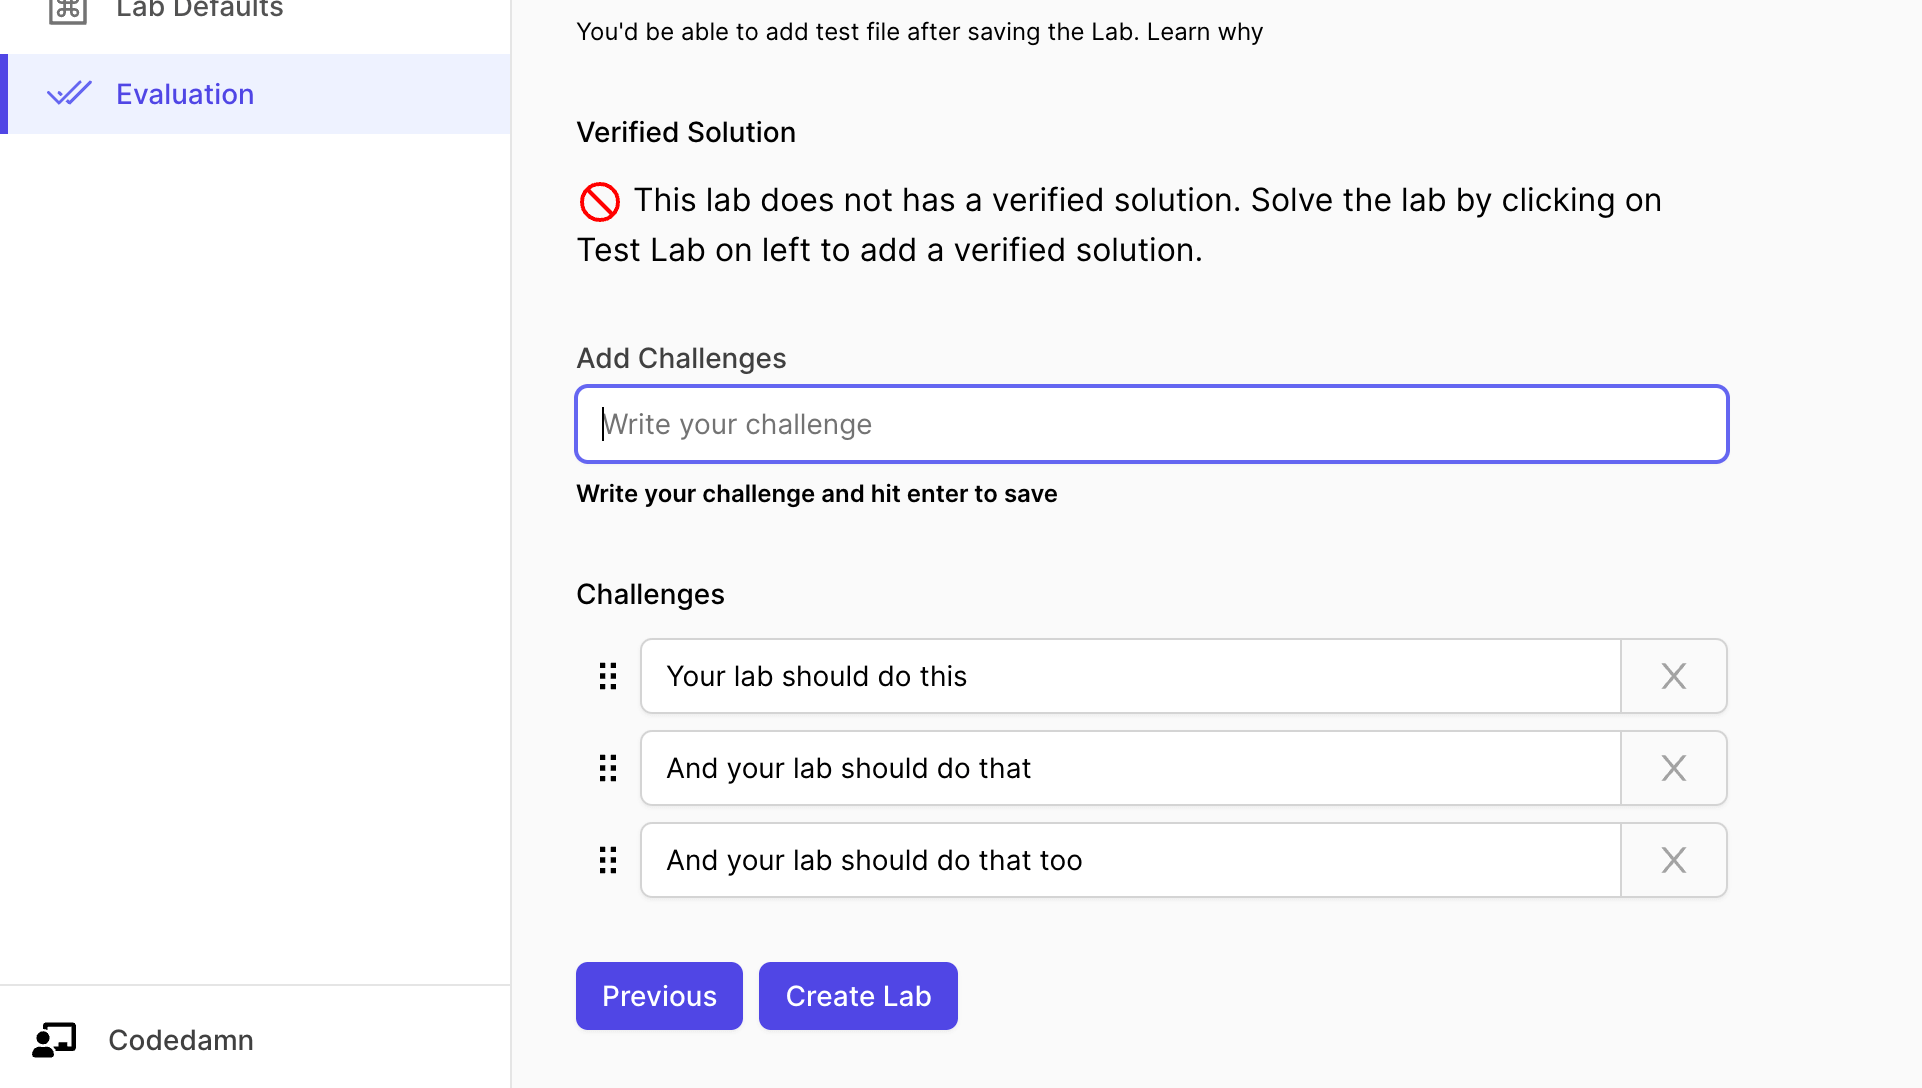
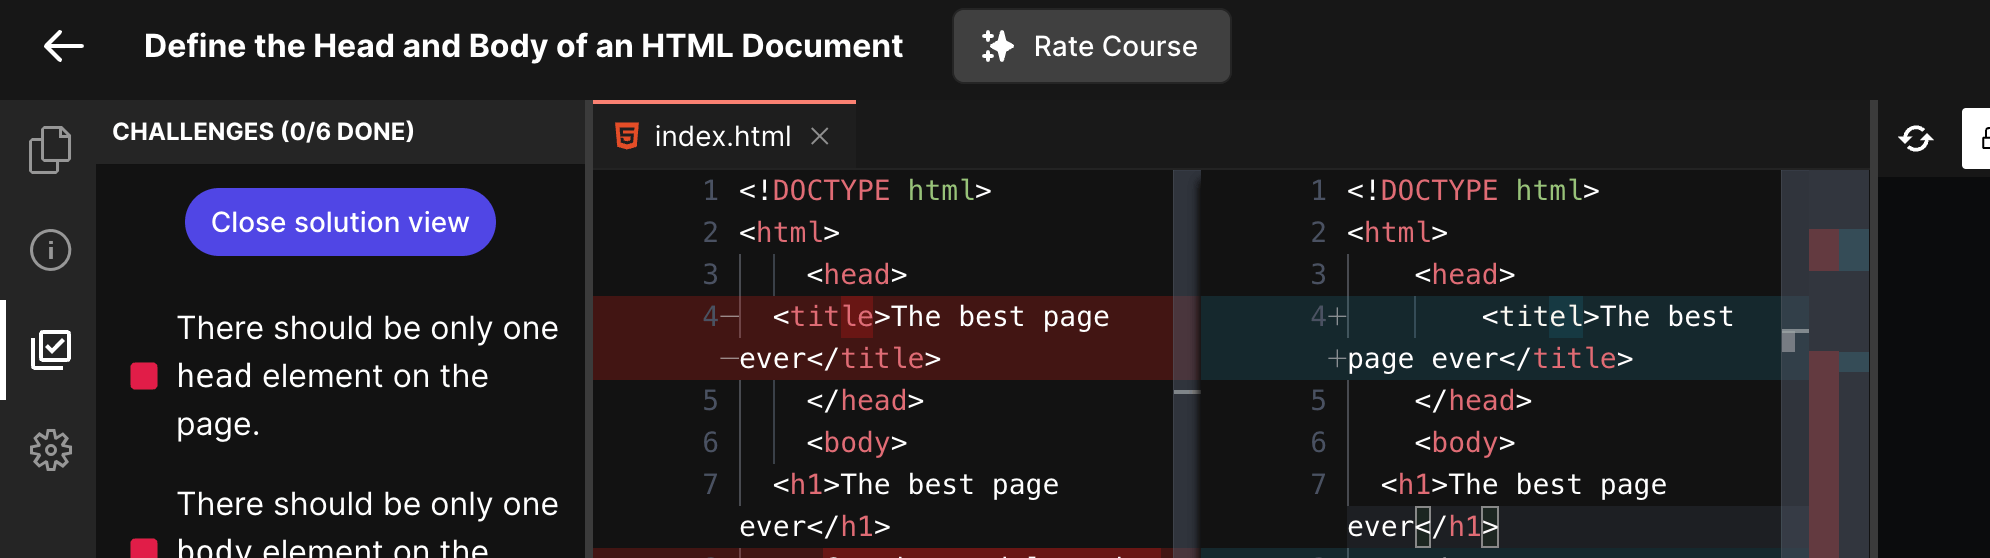
The interface above can be used to add challenges to your lab. You can also add hints to every single challenge you put here.
TIP
When the user runs the lab but fails a few challenges, the hint for that particular failed challenge is displayed to the user.
Step 4 - Evaluation Script
Evaluation script is the first code that actually runs when the user on the codedamn playground clicks on Run Tests button.

Remember that we're using the hardhat utility in this lab to test.
Therefore, your testing script would look like as follows:
# move the test file to user directory (hardhat testing util requires it)
mkdir -p /home/damner/code/test
mkdir -p /home/damner/code/.labtests
mv $TEST_FILE_NAME /home/damner/code/test/codedamn-evaluation.test.js

# run hardhat testing util assuming we have correct mocha settings
cd /home/damner/code
yarn --silent hardhat test 2>&1 > /home/damner/code/.labtests/payload.json

# process.js - run a light node script to extract out results and write them back in expected format
cat > /home/damner/code/.labtests/process.js << EOF
import fs from 'node:fs'

const fileData = fs.readFileSync('/home/damner/code/.labtests/payload.json', { encoding: 'utf8' })
const payload = JSON.parse(fileData.slice(fileData.indexOf('{')))
const answers = payload?.tests?.map(result => {
    if(result.err.stack) {
        console.error(result.err.message)
        return false
    } else {
        console.log('Test passed')
        return true
    }
}) || []
fs.writeFileSync(process.env.UNIT_TEST_OUTPUT_FILE, JSON.stringify(answers))
EOF

# package.json
cat > /home/damner/code/.labtests/package.json << EOF
{
    "type": "module"
}
EOF

node /home/damner/code/.labtests/process.jsYou might need to have a little understanding of bash scripting. Let us understand how the evaluation bash script is working:
- We initially create a
testdirectory inside of the user folder. This is because we'll then runyarn hardhat testwhich requires the tests to be placed inside of thetestdirectory. - We move
$TEST_FILE_NAMEinside this directory.$TEST_FILE_NAMEis a special filename. It is the complete path of a file which is downloaded when the user clicks onRun Testbutton. This file is editable (in the next step). - We then run
yarn --silent hardhat testand then output it's result into a file contained in env variable$UNIT_TEST_OUTPUT_FILE. The value inside this variable maps to a special file that the playground eventually reads to determine the status of all the challenges. - We then create a very simple script in JS that reads the output by
hardhat test. Note that this output is generated bymocha. It is important that this output is in JSON. You have to make sure that yourhardhat.config.jsis as follows:
// ...other code
module.exports = {
	// ...other code
	solidity: '0.8.4',
	mocha: {
		// * the reporter here needs to be JSON
		reporter: 'json'
	}
}- We then convert the JSON result dump into a boolean array and write it back on the same
$UNIT_TEST_OUTPUT_FILE - This file is then read by the playground, and a corresponding
PASSorFAILis assigned to every challenge. For example, if we finally wrote[true, false, false, true], this would mean that Challenge 1 passed, Challenge 2 and 3 failed, and Challenge 4 passed.
:::note At this point we're yet to write the testing script that is executed by yarn hardhat test. We'll do that in the next step now. :::
Note: You can setup a full testing environment in this block of evaluation script (installing more packages, etc. if you want). However, your bash script test file will be timed out after 30 seconds. Therefore, make sure, all of your testing can happen within 30 seconds.
Step 5 - Test file
You will see a button named Edit Test File in the Evaluation tab. Click on it.
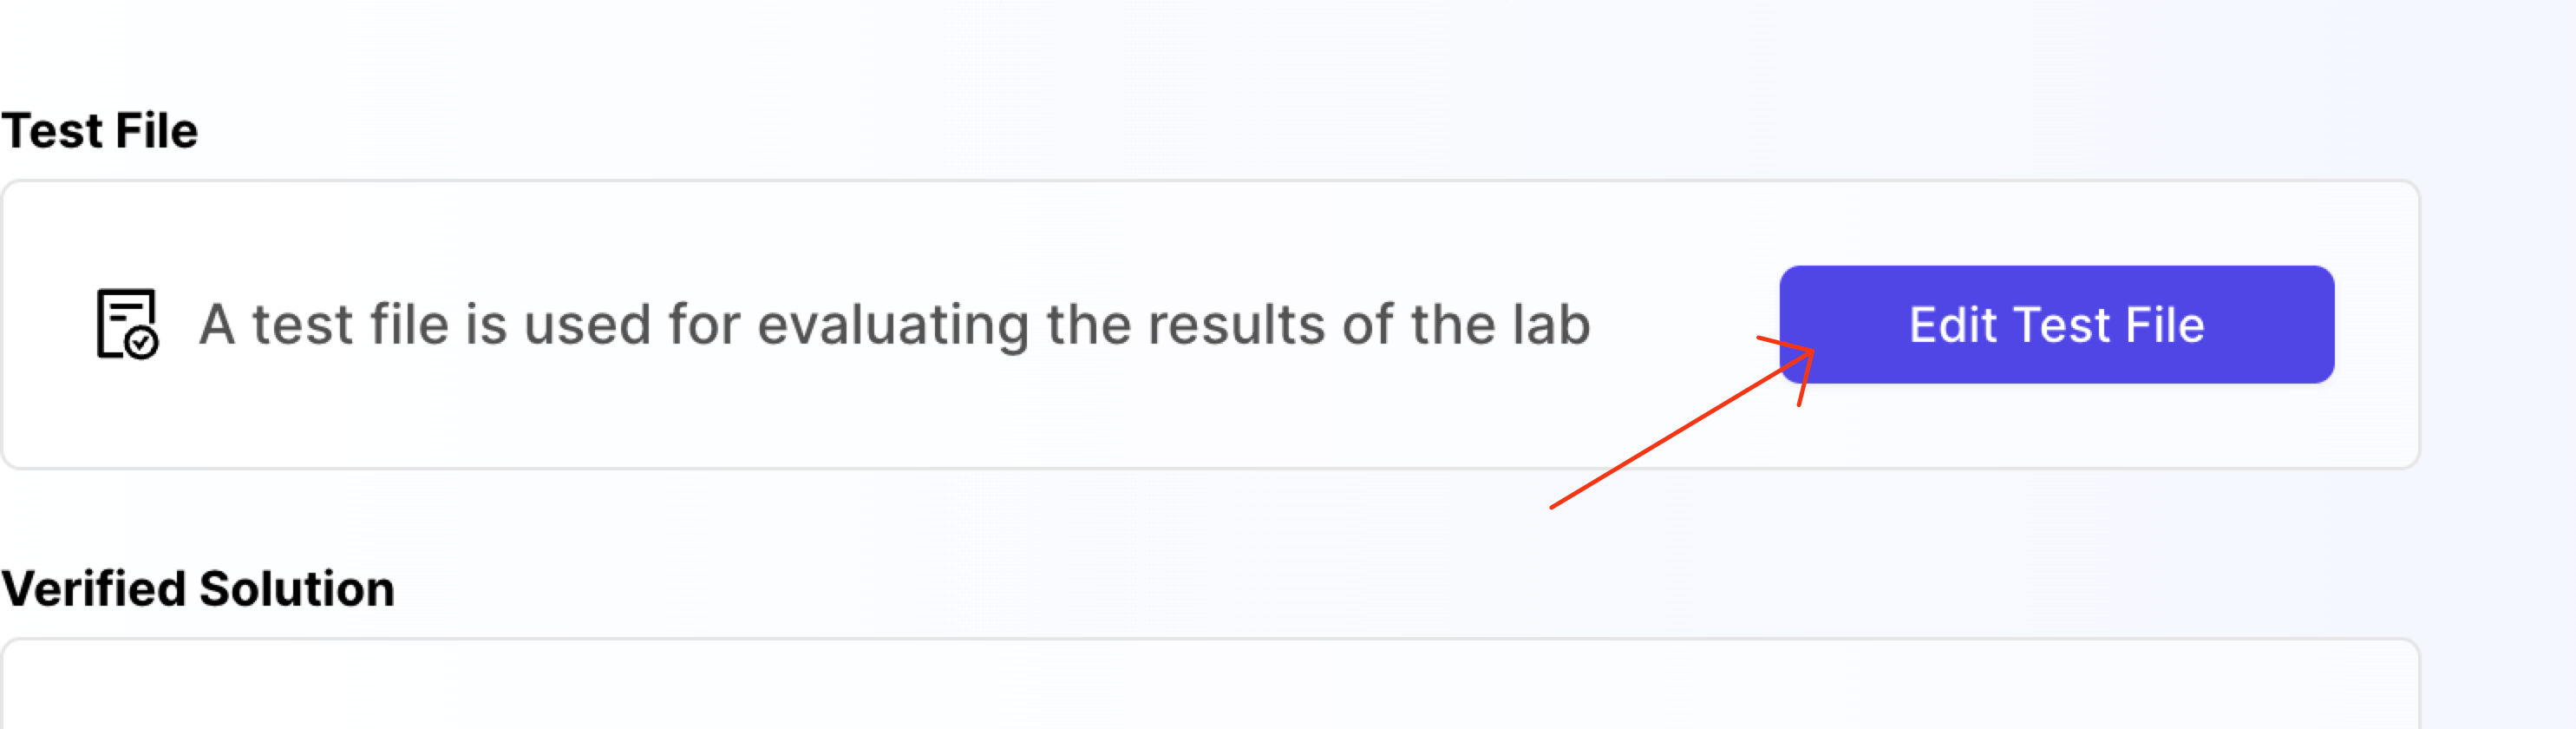
When you click on it, a new window will open. This is a test file area.
You can write anything here. Whatever script you write here, can be executed from the Test command to run section inside the evaluation tab we were in earlier.
The point of having a file like this to provide you with a place where you can write your evaluation script.
:::note For Solidity labs, I'm assuming you will be using the hardhat test alongside mocha to test the user code. Hence, we use the mocha testing syntax here. :::
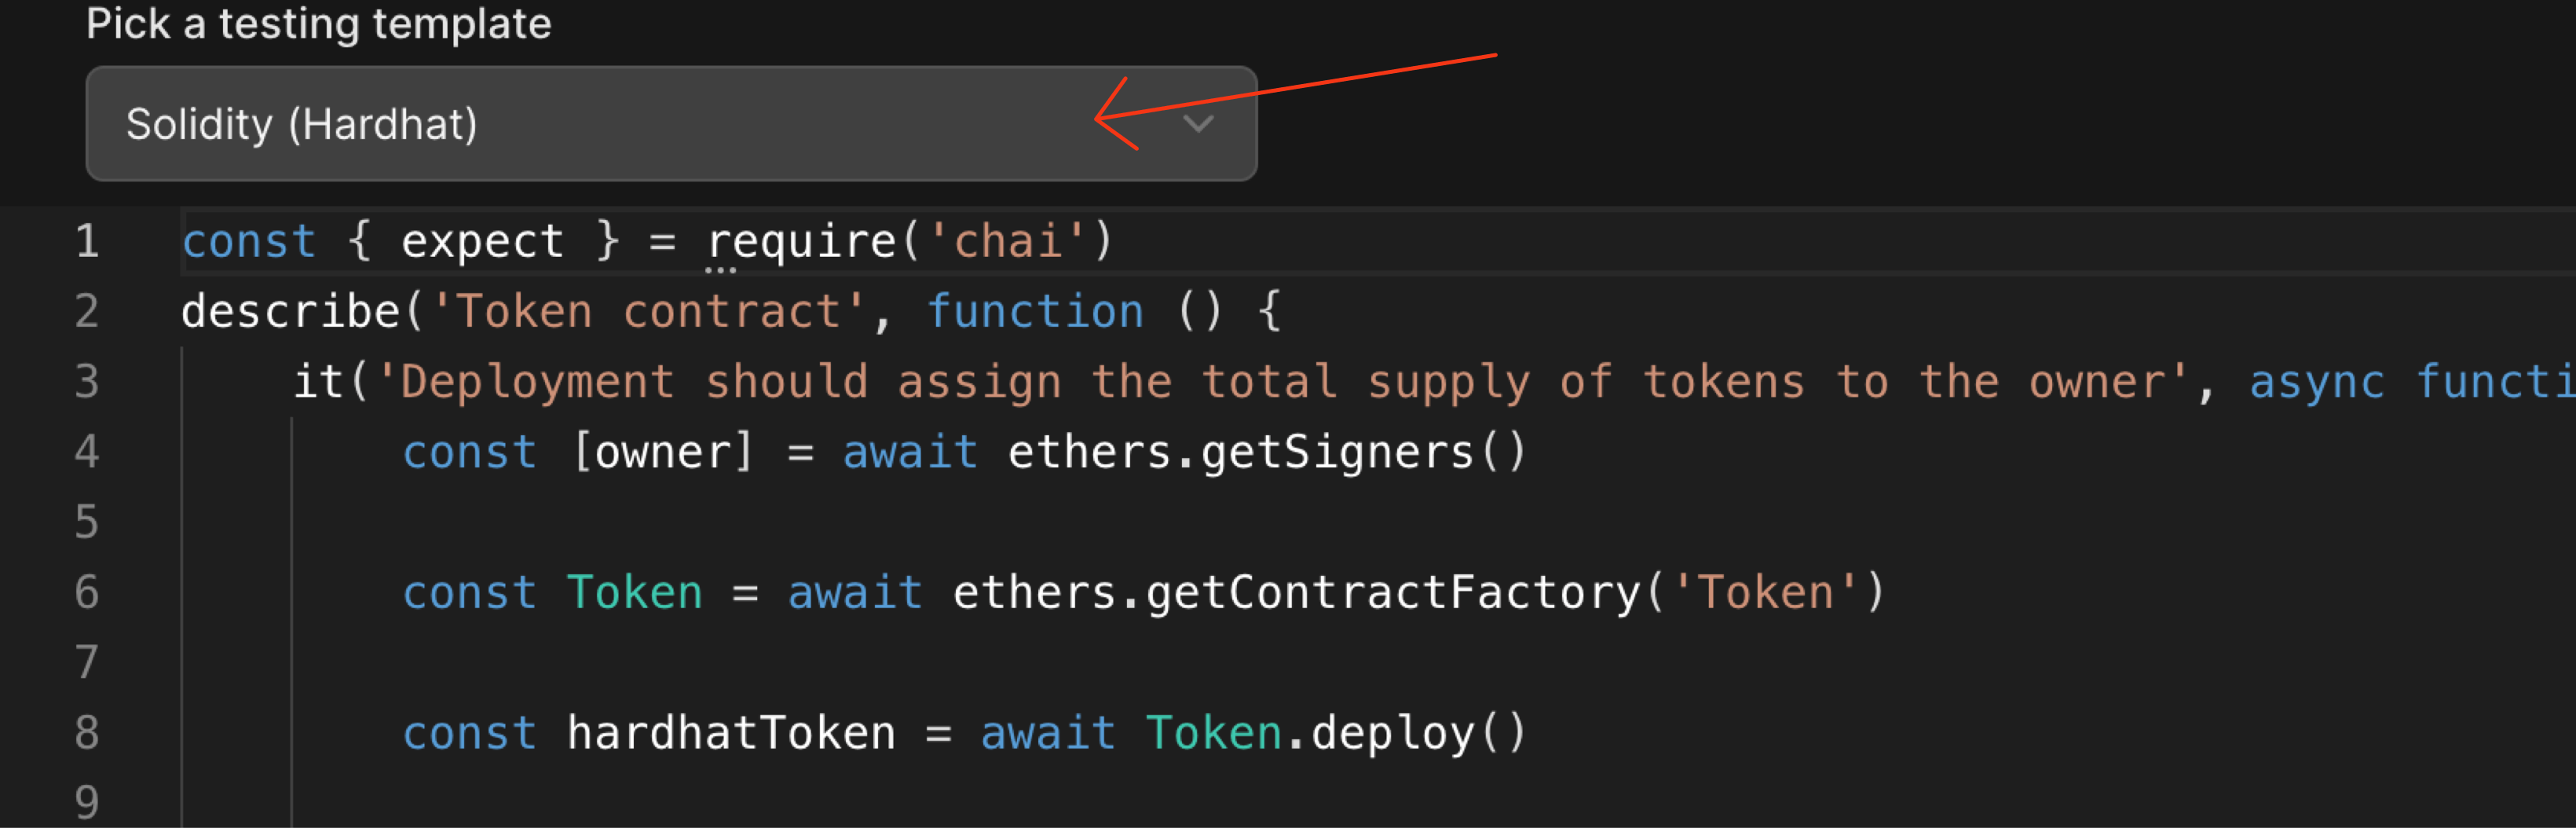
Select Solidity (Hardhat), and the following code should appear in your editor:
const { expect } = require('chai')

describe('Token contract', function () {
	it('Deployment should assign the total supply of tokens to the owner', async function () {
		const [owner] = await ethers.getSigners()

		const Token = await ethers.getContractFactory('Token')

		const hardhatToken = await Token.deploy()

		const ownerBalance = await hardhatToken.balanceOf(owner.address)
		expect(await hardhatToken.totalSupply()).to.equal(ownerBalance)
	})
})This test suite is written how a typical hardhat test suite should be written. You can find how to write hardhat test suites in their own documentation here: Testing smart contracts with hardhat
Note:
- There must be only 1
describeblock here (this is an assumption in our evaluation script). - The number of
it(...)functions inside your test file suite should match the number of challenges added in the instructor Evaluation tab area. - If your number of
it(...)blocks are less than challenges added back in the UI, the "extra" UI challenges would automatically stay as "false". If you add more challenges in test file, the results would be ignored.
This completes your evaluation script for the lab. Your lab is now almost ready for users.
Setup Verified Solution (Recommended)
Verified solution is highly recommended. To setup a verified solution for your lab, once your lab is ready, all you have to do is click on "Test lab", write code that passes your lab, and run that code once.
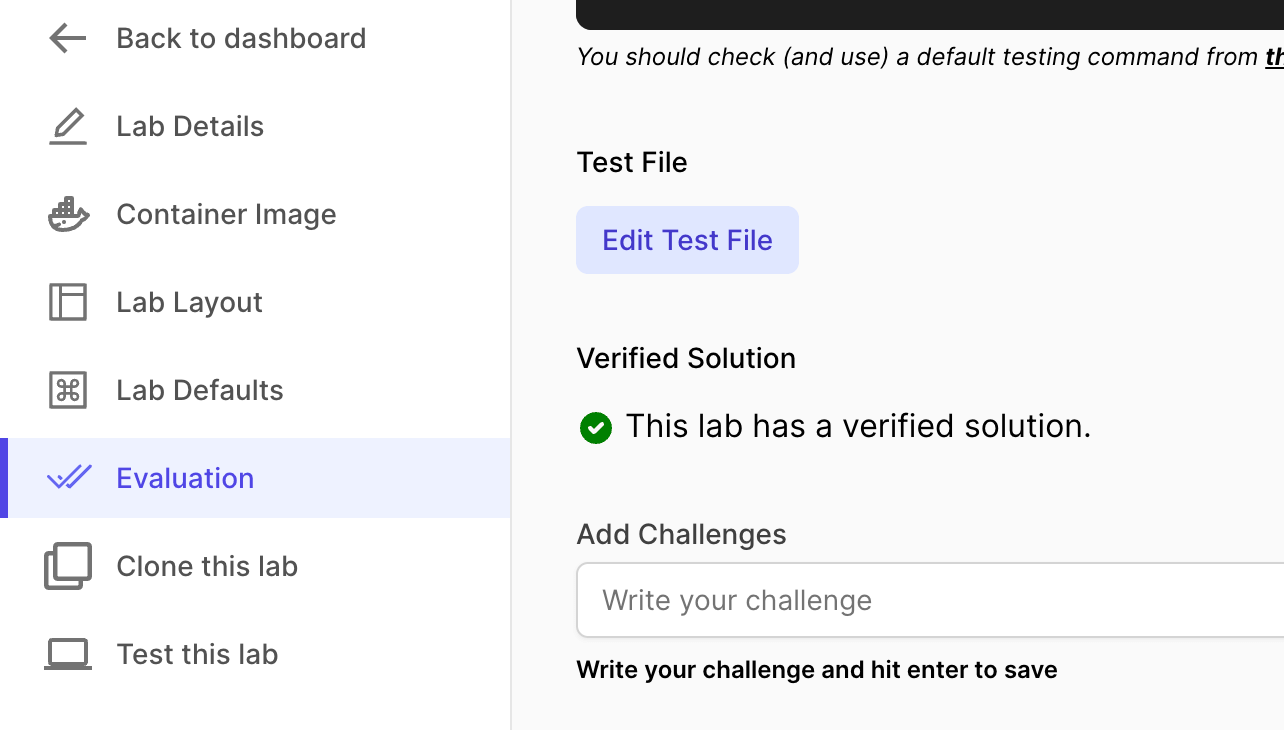
Once you do that, your lab would be marked a lab having verified solution. It also helps students as we can show them a Monaco diff editor showing the verified solution from the creator (you).
At this point, your lab is complete. You can now link this lab in your course, ready to be served to thousands of students 😃 Watch the video tutorial below to understand: